Archimedia Studios

  • Home
  • Our Company
  • Expertise
  • Blog
  • Contact Us

Take your photography to a new level with Concept Shooting

May 7, 2011

The adage “A picture is worth a thousand words” is the very essence of concept photography.

Concept photography is the art of conveying a message through the art of photography.

Concept Shooting is a way of approaching photography that can take your work to a new level. It takes a little more thought than just going ’snap happy’ but can really help you to convey a message with those viewing your shots.

Concept shooting is similar to advertising, stock, and photojournalism for several reasons. First, concept shooting involves some intense analyzing of a “message” you want to strongly convey. Second, concept shooting involves careful consideration of your audience and how the message will touch them most powerfully. Third, concept shooting is centered on emotions, and the telling of a story in its message.

Concept shooting involves a great deal of “mental” preparation, rather than on scene analyzing. Before you shoot, you decide several things.

  • Message: Message is the core of concept photography. Is your message true love or broken hearts?
  • Angle of the message: Is your angle the true love of family or the true love of kindred spirits? The bitterness and pain of broken hearts, or the recovery?
  • Audience: Is your story written for first time high school lovers, or 50-year marriage partners?
  • Emotional connectors: In what ways can you cause your story to resonate best with your audience? The love that brings a sense of belonging? The love that will last forever? The pain of betrayal? The despair of no hope for recovery?
  • Creative composition: An audience of high schoolers will require edgy, high contrast, and inventive imagery. An audience of older couples will perhaps be impacted more by elegant, soft, and expressive imagery.
  • Dynamic artistry: Camera angle, type of lighting, color, venue, depth, and motion…all such factors will influence the overall outcome of your concept shot.
  • Story telling quality: In one image, does your concept tell the complete story? A picture is worth a thousand words, so one image can capture depth of story. It will simply take some time in thought, and some well developed shots.
    • For example, we’ll apply each of these considerations to the concept of love:
  • Concept: Love
  • Message: Broken Heart
  • Audience: Young women who lost their first love
  • Emotional Connector: Feeling of aloneness and walking away from what once was;
  • Creative composition: Taken from the ground so the broken heart is considered first before the girl; the girl is anonymous adding to mystery of who is experiencing the broken heart
  • Dynamic Artistry: The broken heart is in 2/3rds of the frame dominating the image, but attention is given equally to the girl due to the fact that she is walking toward the vibrant blue ocean
  • Story telling quality: Does this single image describe the feelings, the experience, and the hurt of a broken heart?
  • Filed Under: Photography

    Photographing Flat Artwork

    April 1, 2011

    Natural Light
    The best way to photograph flat artwork is to use natural light. If possible, bring the piece outside and find an open but slightly shady area. The shade helps protects the artwork from sun damage or curling. Place a white or black poster board on the ground near where the shade ends, as a background, then place the art on top of the poster board. If the art cannot come outside, it is still best to use natural light from a nearby window if you can, or light from a room where the art is hanging.

    Taking the Shot
    Before you take the shot, compose it so the outside lines are lined up straight in the frame. Do not use a wide angle lens, as it will distort the sides of the art. Instead, aim the camera straight down on the piece, and fill as much of the frame with the art as possible. Use a fast shutter speed. Also, bracket the exposures. Bracketing is when you take one shot regularly, then one overexposed shot and one underexposed shot, so you take three photos of each piece. To overexpose or underexpose the shot, adjust your aperture one f-stop up or down from where it currently is. Some cameras also have built in over- or underexposure settings. You might actually like some of the over- or underexposed shots better!

    Reflection

    Reflection might be an issue you run into when you shoot flat art, especially if the art has a glossy or laminated finish, or if you use a piece of glass on top of the art to flatten it for the photo. If this is the case, move the camera slightly until you get a shot without a reflection bouncing back. Or, get a piece of black foam core board and cut a hole large enough for you to shoot through. Stick your lens through the hole and shoot away. The foam core board will help absorb any reflection to help keep it out of your photo. If you need to use a flash because you are indoors, it is best to use an external flash, and position it on the side rather than straight at the art to help avoid reflections in the shot. Finally, use your favorite post-production tool(i.e. Photoshop) to add a bit of color warmth into the final shot if needed.

    Filed Under: Photography

    What is Magnification Ratio?

    March 29, 2011

    “Magnification ratio” is a technical term in photography. Such ratios are based on size comparisons between real-life subjects and how they are captured on film. Magnification ratios measure the degree in which these comparisons differ. Those falling between the range 1:1 and 4:1 (values to be identified shortly) are usually referred to as “macro photography,” which simply means close-up photography. In reality, a magnification ratio — ungainly as it sounds — measures the photographer’s desire to see the object as it truly is.

    Identification

    • A magnification ratio of 1:1, or life-sized, means that a subject that is 1 inch long in real life will also measure 1 inch on film, whereas a 2:1 ratio means that the subject captured will appear twice its size. The numerical sequence moving from life-size to smaller and smaller increments is therefore expressed as 1:1, 1:2, 1:3, 1:4, and so on. Inversely, a magnification ratio of 2:1 or 3:1 means that the subject on film will appear twice or three times its original size.

    Significance

    • In close-up photography, the magnification ratio determines the level of detail revealed in the shot. As one moves closer to the subject, the total area recorded decreases, therefore magnifying the level of detail seen. Most 35mm and 50mm lenses can capture a subject at 1:2 magnification.

    Effects

    • This works well for small paintings, snapshots, small product work, flowers, and cropped portraits, among other natural objects. Nonetheless, many lenses will require a close-up accessory such as an extension tube, which fits between the camera and the lens, to zoom in beyond a 1:4 ratio

    Check the specifications of your lens to find it’s magnification ratio.

    Filed Under: Photography

    Photo tips on the Direction of Light

    March 21, 2011

    The direction of light describes where the light source is in relationship to you and your subject. It can change the look of your subject dramatically and therefore requires you to adjust your metering techniques somewhat. In the sections that follow, What follows is a description of light based on the direction it’s coming from and make some suggestions for using it.

    How you choose to use the direction of light depends on which of the attributes of that particular light may or may not suit your purpose for a given image

    Frontlight

    You have frontlight when the light source is on the same side of your subject as you are, like when the sun is behind you or when the flash on your camera goes off.

    Following are the characteristics of frontlight:

    • It’s very even.
    • It doesn’t add contrast to the subject.
    • It shows colors and shapes well (unless the shapes are three-dimensional).
    • It’s good for a variations in subject tonality.
    • It usually minimizes texture.
    • It can make subjects look flat and two-dimensional.
    • It can be boring unless you have a subject with strong variations in color or tonality.

    Frontlight isn’t great in all situations, but when it’s soft, it’s the best light for minimizing imperfections in human skin. (Now you know why they put that huge light in front of you when you got your school pictures back in the day.)

    Avoid taking photos of people when they’re facing the sun. It may be frontlight, but it’s too harsh.

    Even though the majority of people take lots of front-lit photos, you’ll be a better photographer, hone your exposure skills more quickly, and have more dramatic images if you take a higher percentage of backlit and side-lit photos.

    Sidelight

    If the sun or light source is to the side of your subject, you have sidelight – half the subject is lit and half is in shadow. The mix of light and shadow increases the contrast in the subject. The characteristics of sidelight are as follows:

    • It’s dramatic.
    • It can cast long shadows when the sun is low in the sky.
    • It makes subjects more three-dimensional.
    • It’s great at revealing texture.
    • It can reduce the amount of color information.
    • It’s harder to meter than frontlight.

    Landscape photographers love sidelight, especially warm sidelight when the sun is low across the sky, because it creates long shadows across the frame.

    Some subjects tend to lack color interest, but they really pop with the contrast between light and shadow that sidelight creates.

    Backlight

    You have backlight when the sun or other light source is behind your subject. It’s bold and dramatic, but it’s also a challenge to work with. Never fear, though. The photos you get when you use backlight are totally worth it.

    Following are the characteristics of backlight:

    • It creates dramatic contrast.
    • It can significantly reduce the color information in your subject.
    • It emphasizes shapes (so it’s better for when you want shapes to take priority over color).
    • It can create dramatic rim lighting (a bright halo of light around your subject) when the sun is directly behind the subject.
    • It creates a fresh look because most people rarely try backlighting.
    • It can be used to create silhouettes.
    • It darkens unlit areas of the subject.
    • It’s the most challenging type of light meter.

    Filed Under: Photography

    One Point Perspective Photography

    February 22, 2011

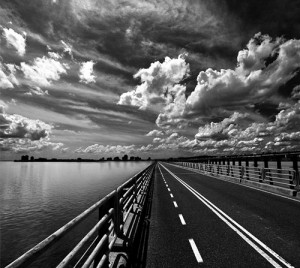
    We are huge fans of  Black and White photography and one point perspective photography. One point perspective is defined as a straight on view with only one vanishing point, hence the term one point perspective. Parallel lines converge on one point in the distance known as the vanishing point. So here is an example of both combined.

    Filed Under: Photography

    • « Previous Page
    • 1
    • 2
    • 3
    • 4
    • 5
    • 6
    • …
    • 9
    • Next Page »

    Delivering Customer Experience Excellence

    Let's give em' something to talk about!

    Contact Us

    Copyright © 2025 · Archimedia Studios · Privacy Policy