Archimedia Studios

  • Home
  • Our Company
  • Expertise
  • Blog
  • Contact Us

Photographing Concerts without a Pro Camera

January 15, 2011

A very common question from a variety of people is how to best shoot a concert with only a point & shoot camera. First let’s break it down into the facts of the situation:
  • Most venues will not allow cameras with detachable lenses, meaning you are limited to a compact camera
  • If you are attending a rock concert, you will want to have a smaller camera anyway just for ease of carrying
  • No matter how bright the lights appear on stage, you are shooting in a low light situation
  • In addition to low light, you are also shooting in lights that are constantly changing
  • You want to avoid using flash whenever possible
  • You are shooting what are often fast moving targets
  • In the pit, you are going to be bumped and pushed around

The reality is that your average point & shoot camera, which usually works on automatic settings only, isn’t going to cut the mustard. In order to stand a chance at getting some decent shots, you will need to step it up to a point & shoot with manual settings. These cameras will at minimum run in the $200-400 range. Examples of these types of cameras are the Panasonic Lumix DMC-ZS5, some of the newer Canon PowerShots and the Nikon P100.

A point & shoot with manual options will have a dial with the letters M, S, A, P plus whatever other features that particular model offers. Why do you need manual setting? Because in a concert setting the automatic functions will either make your camera go hey  there’s no light, I need to use a super slow shutter speed! Or it will get hit with a random spot light and say , wait!  I need to close up that aperture! As a result, you will usually get crummy photos.

Here we go. Camera instruction book in hand, set your camera to M. Pick something in your surroundings, preferably in low light that you can use to test it out as you go. Use the instructions to find where on the camera you can adjust the F-Stop (also known as the Aperture), shutter speed and ISO. The F-Stop defines how much light gets to the camera’s sensors. A lower number means MORE light. A higher number means LESS light. The shutter speed is exactly what it says and it will always be depicted in seconds, i.e. 1/125 seconds. The ISO is how sensitive the camera will be to light. A high ISO means greater sensitivity to light, but it also means more grain (those ugly little spots all over the image).

For the average concert, try using the following settings: F/3 or 4 (as low a number as I can go), 1/125 shutter speed and ISO 1600. I would also choose to force the flash off. Check the instructions on your camera for how to do this. Now, play with your chosen subject matter  and see what happens when you adjust one setting at a time. Try taking the aperture to f/5 or f/6. What happens when you drop the shutter speed to 1/60 or raise it to 1/200. What about ISO? When you change it, how big is the difference in the brightness of your photo and how much grain can you see?

For the most part, I would recommend jacking up the ISO as high as it will go (usually 1600 on a point & shoot) and leave it there. Unless you’re trying for a photo worth blowing up to poster size, you won’t mind a little grain. You’ll usually find that you will also keep the aperture as wide open as possible. Most point & shoots go to F/4 or if you’re lucky F/3.5. That leaves your main adjustment at show time to shutter speed. Some of that will be personal opinion. Do you want to get as bright a photo as possible with motion blur or do you want to capture a clearer shot that is darker? It’s a tough call and I recommend doing some of both at a show. You couod try to shoot at a range between 1/80 and 1/160, depending on light and movement. Practice using your camera beforehand so you know how to adjust those settings quickly, even in partial darkness.

A more advanced tip: Many cameras will also have a setting for metering. Simply put, this is a measure of the color and light present in the view finder. The standard setting usually samples the whole field of view, which will vary greatly at a concert. If possible, set your camera to “spot meter” mode. Then center that spot on something close to flesh tone as you take the shot. It will help how your color balance turns out. Good examples are the artist’s face or an acoustic guitar. But part of a concert is the cool light show so there’s no harm in capturing that as well.

An important basic technique is to make sure you rest your arms on the barricade (or your friend) and hold the camera as close to your body as possible. This limits camera shake. And make sure your camera comes with a wrist strap. If you just shelled out $400 for a new camera, you don’t want it to go crashing to the ground when a crowd surfer lands on your head.

If you are shooting in a club with very low lighting, or worst of all the evil red lighting, you’re going to have a hard time. If the venue or artist will let you get away with using flash, use it sparingly. It’s distracting to the rest of the audience and it’s  blinding to the band.

As always with photography, practice makes perfect!  Longer term, if you are passionate about photography, we would always recommend stepping up into the DSLR category of cameras.

Filed Under: Photography

Management Insight: Coach or Dictator?

January 13, 2011

Unfortunately, many managers think of the job of managing as a matter of controlling employee behavior.  Despite lip service to “empowerment” and “leadership”, the main thrust of management is to ensure that employees do exactly what management wants them to do.

Under such regimes, employees who disagree with a manager or refuse to do something are “insubordinate” and therefore dangerous.  Many times, the HR group begins to compile a dossier on the “troublemaker” who can’t be adequately controlled.

The natural result of seeing management as a control function is the creation of brittle organizations that can’t adapt to new conditions.  Often this happens because multiple managers in multiple stovepiped groups set up conflicting power structures, each of which is trying to “control” what’s going on. Worst case, you end up with endless turf wars, with managers involved in a supercharged political atmosphere.

Whenever that happens, productive work becomes difficult if not impossible. Individual initiative is killed in favor of a “let’s wait and see what the boss says” mentality.  For example, sales professionals who are micromanaged in this way pay a fairly major productivity tax, probably of around 30 percent.  That’s 30 percent more sales that could be closed if the sales team didn’t have some bozo looking over their shoulder and meddling with the sale.

By contrast, when a corporate culture thinks of management primary as a service position, you get coaches rather than dictators.  Freed of the burden of attempt to “control things”, managers can more easily set a direction and to obtain the resources that employees need to get the job done.  There’s less talk about “leadership” and “empowerment” and more helping people to become more successful.

When managers are seen as being “in service”, decision-making more naturally moves down to the lowest appropriate level of the company. Teams tend to form their own rules and direction without interference.  Just as importantly, the impetus for huge management salaries goes away and the gulf between management and employees shrinks.  That’s a good thing.

BTW, if you want to see how this kind of management works, look at any sales team that has 1) low turnover, and 2) high productivity.  Sales coaching is a relatively well-understood phenomenon and, while there are plenty of controlling sales managers, there are a fair number who understand this “in service” idea and put it into daily practice.

Filed Under: Management Insights

Our facebook obsession/fascination?

January 13, 2011

One out of thirteen earthlings are on facebook and 3 out of 4 Americans are on facebook.

Click HERE for more great stats! (you may have to zoom in on the image)

Filed Under: Marketing Insights

How’s your Diopter?

January 10, 2011

Have you ever looked through the eyepiece of your DSLR and thought things just weren’t  in focus?  Or perhaps you wear glasses and find they get in the way, but you need them to frame your shot properly?

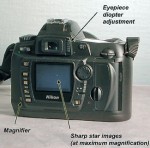
Did you know there is a little dial called the Diopter Adjustment?  This may seem basic for those of you already in the know, yet I have received enough questions and pointed out this miracle adjustment to enough people that I’m hoping this post will help just one of you out there enjoy your camera all the more.

Most brands of DLSRs have a dial of some type to the right of the eyepiece.  Nikon’s can be big or small and obvious, Canon’s is more discrete (especially with the eyepiece cup mounted).  They function the same on both systems.  In essence the diopter adjustment knob works as a lens switching from near to far focus.  It does not effect the focus circuitry of the camera as it is after the auto-focus mechanism.  It only effects how your eye picks up the image.

It works just like the device an eye doctor puts in front of you when checking your vision.  That device has lenses of various concave and convex curves to adjust for nearsightedness and farsightedness.  They adjust for an eye that can’t focus at a reasonable distance, such as for close objects like reading this text.  That little dial on a camera typically has an adjustment range of -3 to +3, with 0 being nominal 20/20 vision, more or less.

If your eye-site is anything less than average (essentially what 20/20 is telling you), this knob will be your best friend to help shoot better photos, especially if you attempt to use manual focus.  To set the diopter correctly, you will need to set your camera on something solid, like a tripod, and point it at something flat with enough texture to be easily seen.  Press your shutter release halfway down to force your camera with auto-focus.

This test relies on the idea that your camera focuses properly, obviously.  Without moving the camera, turn the diopter control until (with or without glasses) the image is in focus to your eye.  That is all there is to it!

I know it seems simple, but sometimes even a small adjustment for those who think they have average eye site can be helpful.

Filed Under: Photography

Frame Rates and Video

January 9, 2011

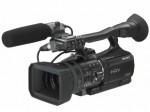
You recently purchased a high def video camera. It offers different frame rates (like 24p, 60i, etc). What do they all mean and how can they create better video?

When to use these frame rates for video:

  • 60i will give you fluid motion. Shooting fast motion like sports, racing cars, trains automobiles and runners for example. 60i is best for shooting fast movement- the video will be more fluid and you can move the camera about more easily.
  • 24p will give you a full frame rather than the odd and even lines so the picture could be considered as better quality, in reality you will see little difference in standard video. The real difference is the ‘effect’ of 24p which is more like film.
  • The upside is you can make something which is more filmic, but you need to do more than just switch to 24p as that is only part of what makes the film camera magic.
  • The downside is you have to be very careful with fast movement in the viewfinder and panning etc must be done at a slower rate
  • 24p is arguably “best” for shooting narrative “film-style” projects since it tries to simulate the 24fps frame rate of film. I also know that it is accomplished through digital pull-down which is sort of a trick to simulate 24fps.
  • 30p is at the standard video 30 fps, but has the advantage of being progressive scan. I assume that 30p is the optimal shooting option for making web based video as well as tv commercials. But I also know that some television shows like  “Everyday Italian” for example, on the Food Network shoots in 24p and it looks great!

  • To sum it all up


Use 60i for stuff that you want to look like TV/news or where motion/camera movement is fast.

24p for film output or creative effect.

30p for more filmic effect.


Filed Under: Filmmaking

  • « Previous Page
  • 1
  • …
  • 37
  • 38
  • 39
  • 40
  • 41
  • …
  • 54
  • Next Page »

Delivering Customer Experience Excellence

Let's give em' something to talk about!

Contact Us

Copyright © 2025 · Archimedia Studios · Privacy Policy