Archimedia Studios

  • Home
  • Our Company
  • Expertise
  • Blog
  • Contact Us

Building your Graphic Design Portfolio

November 20, 2010

When trying to break into the field of graphic design, having a solid portfolio is crucial. If you are job-hunting, your portfolio is what employers will be looking at to decide whether or not to give you an interview. If you are starting a freelance business, potential clients will be comparing portfolios to choose a designer for a project. There are several choices for what type of portfolio to build, and each has their own benefits and considerations that you may need to look at.

Website

Online portfolios are probably the most popular type today. As a graphic designer, some will even assume you have a web site. If your focus is web design, an online portfolio is the choice for you, as it serves as an example of your work.

Benefits:

  • Easy to send out…it’s just a link
  • Can provide a look into your personality
  • Allows for an interactive presentation of your work

Considerations:

  • The most time consuming to create
  • You have to worry about it looking or behaving differently from computer to computer
  • You need the technical knowledge to set it up
  • Expensive to hire someone to develop it for you
  • You will have to pay for a domain name and monthly web hosting (although both can be accomplished for a little over $100/yr)

PDF

Creating a portfolio as a PDF is becoming more and more popular. Using Acrobat, multi-page PDFs can be created from layouts created in a graphics software program (such as InDesign or Photoshop). The result is a brochure style piece that shows examples of your work along with descriptions of projects and related information.

Benefits:

  • Easy to email
  • Control over layout without having to worry about browser and web issues
  • The PDF itself serves as an example of your layout and typography skills
  • Can be printed with consistent results
  • Relatively quick and free to create

Considerations:

  • Relies on the user to save and open the file
  • Less effective for showing web design projects

The Classic Portfolio

The classic portfolio, an actual book of various sizes with printed examples of your work, still serves a purpose in today’s “digital world.” There are several ways to present such a portfolio, from placing prints in a pre-made book with sleeves, to creating your own custom, bound book.

Advantages:

  • Shows your work in its actual, final format
  • Great for showing off print design
  • Can be brought to a meeting and shown without a computer

Considerations:

  • Must be delivered by mail or in person
  • If you leave with a potential client or employer, you are left without a portfolio

In the end, the type of portfolio you choose to have will depend on your budget, available time and type of work. For web designers, an online portfolio is a no-brainer. If you don’t have the time or budget to set up a web site right now, you should at least have a PDF so you have something to email. A classic portfolio is great to bring to a meeting and show off your best print work.

As a portfolio is a key marketing piece, it should be taken seriously, and a combination of the options above might be the right choice to get you your dream job or client.

Best advice, try to have all three of the above portfolio types (cover all of your bases!). Remember, you are marketing yourself , you are the brand!  Never settle for only one method of presenting you and your work!
Filed Under: Graphic Design

Are you using a Tablet?

November 4, 2010

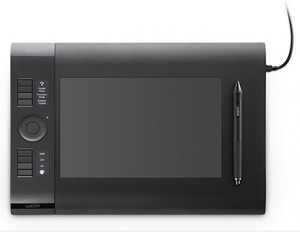
For the modern graphic designer or illustrator, there’s only one hardware device that is a must-have in the workstation:  and it’s not even a pencil.  It’s a tablet like the Wacom Intuos4, a pen and tablet station for computers that allows you to “draw” directly onto a computer monitor, creating your images in real-time and with full capability with vital software like Adobe Photoshop.

The Transition to Paperless Illustrator

It wasn’t long ago when almost all illustration was still done on a form of treated wood and pulp known as paper; today, our lives are utterly transformed not only by the technology of computes, but by their availability.  Products like the Wacom Intuos4 are actually relatively easy to acquire, and if you have a specific need that they can fill, they’re necessities around the office or home workstation.  Going paperless means that you don’t have to worry about one stage of your designs unless you – quite simply – want to include paper drafts as part of your routine.

Is it a little disconcerting to give up the absolute control of the pencil-to-paper medium?  It can be, but it’s not necessary.  You’ll find that the pressure sensitivity of the Wacom Intuos4, as well as the overall interaction with the product, make it ideal for anyone who’s used to the pen-to-paper style of illustration.  And once you’ve used a tablet, it will feel odd to illustrate on a computer any other way; after all, a mouse simply just doesn’t do it.

The Touch Ring will also give you access to features you can’t get on paper, such as zoom-ins and zoom-outs.  You’ll also be able to change the degree of pressure it takes to make a line on the tablet, which is essentially like being able to change the kind of pen you’re using – without changing your tablet pen.  It’s that cool.

Filed Under: Graphic Design

How to approach a design project

October 24, 2010

1. Check out a bunch of inspirational collections

Before putting pen to paper or mouse to Photoshop, take a step back and check out some other designer’s work. You’ll be amazed, or not. You’ll get a fantastic idea of what you should do, or maybe of what you shouldn’t do. Plus, you’re passively growing your skill set by exposing yourself to different thoughts and styles.

2. Outline and Organize

Sometimes, it’s best to step away from the creative process and start a new design with a more logical approach. Perhaps your last project went out of control and you ended up designing twice as much as you should of, or you realized you designed something that was completely not in the project scope.

Take a step back and gather your materials. Grab the information your client sent you and any tools you need. Write yourself a step-by-step to do list of what needs to be accomplished before the project can be complete. Then proceed by tackling each step one by one.

3. Go for a Walk and Take Snapshots

Outdoors, whether it’s around town or in the woods, can be a great escape for the creative mind. Take your camera with you and take a photo of anything that makes you think of the project (or that you generally like). Maybe there’s a sign that captures the feel you’re trying to create, or maybe the way the grass is blowing is just the right feeling you want to invoke through your design.

4. Start Sketching

If you’ve got an idea, go for it! Grab your sketchbook, spare paper, or whatever you like using and immerse yourself in the design. Whether or not you use your sketches in the new project doesn’t really matter. What does matter is getting your thoughts out of your head an onto paper.

Don’t forget to set an alarm if you need to be anywhere or do something at a particular time. It’s easy to lose track of time when you’re in the middle of a good sketching session.

5. Create a Project Board

Print photos, sketches, project flow charts, project specs, or anything that relates to your new project and create a project board. Use a glue stick, tape, or even staples to compile the pieces across cardboard, a whiteboard, or on the wall near your workspace.

Having this visual information directly in front of you and not tucked away on the web in bookmarks and folders can make the design process much more fluid. Plus, the act of creating the project board helps focus your thoughts and your client’s wishes before starting the actual design.

6. Schedule Your Design Time

If you know you work best at 8am or 3 in the afternoon, schedule a chunk of time to start the design. Turn off your phone and email for at least a half hour and take advantage of the design-only time.

Alternatively, if you’re looking to shake things up, schedule design time at a really strange hour. If you normally work 8-4, schedule design time for the evening or on a weekend morning. You probably don’t want to make a habit of working at strange times, but shaking things up may change your perspective for the new project.

7. Start with Your Favorite Task

There’s always one part of a project that you absolutely love to do. Maybe it’s picking out the fonts, or developing the navigation, but try starting with this single element first. It may not always make sense to start with the task you love, but you might find that the rest of the project is more enjoyable or turns out differently than you would have expected.

Alternatively, choose the task you dislike the most. Getting the awful stuff finished will make you feel accomplished and allow you to enjoy the rest of the project with fewer worries.

8. Refer to Your Best Work

Sometimes it’s good to get a reminder of what you’re capable of. Compile some of your best work and think about what made each piece great. Is there something that unites that that you can pull from for the new project? Or were they projects that you enjoyed for a specific reason? By examining yourself, you might able to replicate the results.

Filed Under: Graphic Design

Why clients run away from designers

October 18, 2010

There is an old adage, ‘Old habits die hard’. Bad habits, if prolonged, develop into your second nature. Graphic designers alike, possess certain behaviors that have adverse effects on their clientele. The quality of work isn’t the only recipe of winning clients, it is HOW you go about performing your work that really influences your clients.

For graphic designers, it is imperative to understand what client personality you are dealing with. This enables you to adjust to their behavior and connect with them properly. But there are certain practices that designers must avoid since they directly affect their relationships with clients. Following are eight harmful habits that a graphic designer must beware of:

The Bossy Attitude

Graphic designers who try to solely dictate the terms of the project end up losing clients. Since every client wants his work to be tailor-made according to his wants and desires, not listening to their proposals would end them in dissatisfaction.

Too submissive:

When a client comes to a graphic designer, he is looking for someone who knows what to do and how to do. When a client tells the designer what to do, they expect them to know HOW to do it. Asking too many questions can annoy clients and drive them away. Moreover, being submissive allows clients to take undue advantage of you.

Over-Confidence:

Since graphic designing is a proper profession, one must act professional too. Over-confidence and casual attitude is a real turn-off for clients. When they approach a professional graphic designer, they expect a professional attitude as well. Acting over-confident makes your client think that they’ve come to the wrong place.

Taking things personally:

When graphic designer starts taking things to heart, clients think that they don’t have control over their emotions. They deem it as a sign of an amateur and incompetent person. I know most of you would not believe in the term “customer is always right”, but one should be competent enough to deal with difficult clients.

Sloppy appearance:

In the professional world, appearance matters. You never know your first impression might your last…so make the first one count. When client see designers in sloppy appearance, it gives a negative feeling that their project might end up sloppy as well.

Presumptuous Nature:

The problem is when the client is not taken on board with the project details and proceedings, chances are that he will get dissatisfied with the graphic designer’s work. Clients may think that you are over-confident and don’t consider his opinion valuable.

Sluggish Worker:

The effects of procrastination are simple. You fall behind your schedule and in the process disappoint your clients. Moreover, when your clients see that you have a habit of delaying tasks, they will consider you as a lazy and sluggish designer. Since they will be afraid of not getting their projects on time, they might not consider you in the first place.

Bad communication skills:

Since negotiating with clients needs convincing power, introvert and reserved graphic designers often don’t clearly state their terms and conditions. Ultimately, they end up being undervalued and underpaid by their clients.

Filed Under: Graphic Design

Emphasis: Focal Points in Design

October 9, 2010

Something that is singled out or made more prominent has emphasis. An element of a design that dominates or becomes the center of interest has emphasis. Within the visual components of a page design, emphasis is applied to individual parts such as a word or phrase by changing its appearance, making it stand out. Sometimes considered a principle of design on its own, emphasis can be created using all of the various elements and principles of design.

Emphasis and the Elements of Design
Create a focal point by making one element of the design more prominent or eye-catching than the others.

  • Line. In a design composed of horizontal lines, the vertical line becomes the focal point.
  • Shape. A square stands out from a group of circles or organic shapes.
  • Mass. The physically or visually heavier element or piece commands more attention.
  • Texture. Embossing adds tactile interest and emphasis.
  • Color. A splash of color or a strong change in value in an otherwise gray piece will draw the eye.

Emphasis and the Principles of Design
Use the arrangement of the page components to create a focal point or visual hierarchy of dominant and subordinant elements.

  • Balance. A perfectly symetrical piece may have no focal point because each element is equally emphasized. Radial balance generally draws the eye first to the central point in the design.
  • Proximity. A part of the design that is isolated from other parts can become a focal point.
  • Alignment. The eye is naturally drawn to a point in or near the center of a page, giving elements in that area perceived importance.
  • Repetition. Repeating an image or a word can establish its importance.
  • Contrast. Set words or phrases in a contrasting bold type or italics to give them emphasis.
  • White space. Use white space to isolate elements and give them emphasis.

Filed Under: Graphic Design

  • « Previous Page
  • 1
  • …
  • 7
  • 8
  • 9
  • 10
  • 11
  • 12
  • Next Page »

Delivering Customer Experience Excellence

Let's give em' something to talk about!

Contact Us

Copyright © 2025 · Archimedia Studios · Privacy Policy