Archimedia Studios

  • Home
  • Our Company
  • Expertise
  • Blog
  • Contact Us

Why clients run away from designers

October 18, 2010

There is an old adage, ‘Old habits die hard’. Bad habits, if prolonged, develop into your second nature. Graphic designers alike, possess certain behaviors that have adverse effects on their clientele. The quality of work isn’t the only recipe of winning clients, it is HOW you go about performing your work that really influences your clients.

For graphic designers, it is imperative to understand what client personality you are dealing with. This enables you to adjust to their behavior and connect with them properly. But there are certain practices that designers must avoid since they directly affect their relationships with clients. Following are eight harmful habits that a graphic designer must beware of:

The Bossy Attitude

Graphic designers who try to solely dictate the terms of the project end up losing clients. Since every client wants his work to be tailor-made according to his wants and desires, not listening to their proposals would end them in dissatisfaction.

Too submissive:

When a client comes to a graphic designer, he is looking for someone who knows what to do and how to do. When a client tells the designer what to do, they expect them to know HOW to do it. Asking too many questions can annoy clients and drive them away. Moreover, being submissive allows clients to take undue advantage of you.

Over-Confidence:

Since graphic designing is a proper profession, one must act professional too. Over-confidence and casual attitude is a real turn-off for clients. When they approach a professional graphic designer, they expect a professional attitude as well. Acting over-confident makes your client think that they’ve come to the wrong place.

Taking things personally:

When graphic designer starts taking things to heart, clients think that they don’t have control over their emotions. They deem it as a sign of an amateur and incompetent person. I know most of you would not believe in the term “customer is always right”, but one should be competent enough to deal with difficult clients.

Sloppy appearance:

In the professional world, appearance matters. You never know your first impression might your last…so make the first one count. When client see designers in sloppy appearance, it gives a negative feeling that their project might end up sloppy as well.

Presumptuous Nature:

The problem is when the client is not taken on board with the project details and proceedings, chances are that he will get dissatisfied with the graphic designer’s work. Clients may think that you are over-confident and don’t consider his opinion valuable.

Sluggish Worker:

The effects of procrastination are simple. You fall behind your schedule and in the process disappoint your clients. Moreover, when your clients see that you have a habit of delaying tasks, they will consider you as a lazy and sluggish designer. Since they will be afraid of not getting their projects on time, they might not consider you in the first place.

Bad communication skills:

Since negotiating with clients needs convincing power, introvert and reserved graphic designers often don’t clearly state their terms and conditions. Ultimately, they end up being undervalued and underpaid by their clients.
Filed Under: Graphic Design

Myths of Branding

October 15, 2010

When people think of branding, they often think of just a logo or business card. Or they think of the opposite extreme, such as Apple or Virgin, and so assume they will never have the budget to “brand effectively.”

Although dazzling branding is more than just pretty pictures, it also is something that is easily attainable if businesspeople put the right thought and effort into it.

Dispelling five popular myths about branding is key to starting that process and transforming your business.

Myth No. 1: Branding Is Hard

Branding is not rocket science. It simply requires focused thought about what you want your business to stand for and to whom, and then a commitment to communicate that message through everything you do visually and experientially.

With our clients, we offer a 10-step process to building a firm brand strategy. But once it’s built, you are never “done” nor do you ever stop being a steward for your brand once all the processes, websites, and logos are in place.

You need to constantly be vigilant and regularly do a “system check” on your materials, business practices, customer service, and messaging to ensure your brand is clear and consistent.

You also need to commit to living your values and ensuring that all your employees and partners can verbalize and live those values as well.

Myth No. 2: Branding Is Expensive

Effective branding can be done on any budget. I’ve worked with $12 million budgets and $1,000 budgets.

The real key to effective branding is making sure that you have defined, in detail, your ideal audience and that your business messages speak directly to their needs and the benefits they value.

Once you have done that, you can work more effectively with a designer to determine your logo or website experience and a writer to craft your brochure and website messaging.

Consistency and clarity in messaging (visual and verbal)—not how much money you spend promoting your brand—is what makes that brand effective and creates rabid fans and evangelists. So if you can spend only $200 on a logo, you can still ensure that it communicates exactly what you want, to whom you want to reach.

True, you may not be able to do multimillion-dollar ad campaigns or sponsor extravagant sporting events. But with clear, consistent, and strong messages, you ensure that even those three or four activities you can afford to do are laser-focused.

Moreover, since a brand is more than just your logo or advertising, you can live your brand through aligned corporate policies and processes. You can easily and cheaply craft a voice-mail message or email signature that furthers that brand. You can extend the brand to free social media that captures customers with limited dollars. And you can ensure your product or service quality and price map consistently to your brand promise.

Those are all things you need to do anyway to run your business, so you may as well align them to a strong brand for maximum “oomph.”

Myth No. 3: Branding Is Just Fluff

Brand equity can make or break a company. And if you think branding has no financial impact, just ask private-equity firms that “buy” brands for billions of dollars, all for the brand cachet or loyal customer base.

That’s the reason people will pay three times as much for a white T-shirt at Nordstrom than they would at Target. Brand translates into bottom-line sales when done effectively.

You can’t deny that if you build a strong foundation and communicate it to the right people at the right time, you will attract just the interested customer you seek.

In addition, a strong brand guides all the other marketing decisions that fuel your company’s growth: where to advertise, whom to partner with, how to price your product, etc.

Myth No. 4: All Designers Are the Same

All designers and branding firms are not the same.

Although you can save money by thinking through a brand strategy on your own, before you engage with a designer on communicating anything visually, some designers get it and some don’t. And, sometimes, you do get what you pay for in that regard.

If you are talking to a designer who does not ask who your target audience is or what you are trying to convey to them through your visual elements—and merely asks you what colors or concepts you like—you need to run the other way. Though you might spend only $100 on a designer and think it’s a steal, you will lose much more in sales and customers by not communicating the right message visually.

Good designers understand how imagery, font, color, and spacing affect the subconscious connections people will make about your company and what it offers. And they should be experienced enough to make some clear recommendations.

It’s worth it to spend a bit more on a designer and work with someone capable who asks about your brand and your ideal customer.

Myth No. 5: Branding Works Immediately

Branding and direct-response marketing are two different things.

People need to experience your brand multiple times before it sticks. You need to have it out there, present in all your customer touch points, before deciding whether it works.

Branding is about awareness and “mindshare”—the spaces you occupy in people’s minds when they see your logo or hear your name. That takes time to build. The Nike swoosh had no meaning during the first three months after it was introduced.

Avoid the temptation to change branding every few months in an effort to chase quarterly sales growth. Yes, if you get feedback that things are not working, you should make changes; but, hopefully, you will have put the up-front thought and effort into the brand strategy and messaging before implementing it so that only slight tweaks are required.

Branding and messaging can be refreshed over time—but not before customers get a chance to respond to it. And although you might be sick of your brand and messaging after three months, remember that because of all the noise in the marketplace your potential customers may not even have seen it yet.

Filed Under: Branding

Get the correct exposure by understanding camera metering modes…

October 15, 2010

Every modern DSLR has something called “Metering Mode”, also known as “Camera Metering”, “Exposure Metering” or simply “Metering”. Knowing how metering works and what each of the metering modes does is important in photography, because it helps photographers control their exposure with minimum effort and take better pictures in unusual lighting situations. In this “understanding metering modes” article, I will explain what metering is, how it works and how you can use it for your digital photography.

Metering is how your camera determines what the correct shutter speed and aperture should be, depending on the amount of light that goes into the camera and the sensitivity of the sensor. Back in the old days of photography, cameras were not equipped with a light “meter”, which is a sensor that measures the amount and intensity of light. Photographers had to use hand-held light meters to determine the optimal exposure. Obviously, because the work was shot on film, they could not preview or see the results immediately, which is why they religiously relied on those light meters.

Today, every DSLR has an integrated light meter that automatically measures the reflected light and determines the optimal exposure. The most common metering modes in digital cameras today are:

  1. Matrix Metering (Nikon), also known as Evaluative Metering (Canon)
  2. Center-weighted Metering
  3. Spot Metering (Nikon), also known as Partial Metering (Canon)

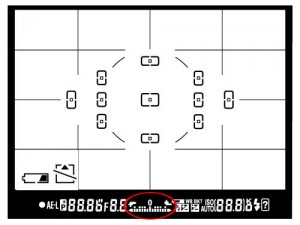
You can see the camera meter in action when you shoot in Manual Mode – look inside the viewfinder and you will see bars going left or right, with a zero in the middle, as illustrated below.

Metering shown in Nikon Viewfinder

If you point your camera at a very bright area, the bars will go to “+” side, indicating that there is too much light for the current exposure settings. If you point your camera at a very dark area, the bars will go to the “-” side, indicating that there is not enough light. You would then need to increase or decrease your shutter speed to get to “0″, which is the optimal exposure, according to your camera meter.

A camera meter is not only useful for just the Manual Mode – when you choose another mode such asAperture Priority, Shutter Priority or Program Mode, the camera automatically adjusts the settings based on what it reads from the meter.

Camera meters work great when the scene is lit evenly. However, it gets problematic and challenging for light meters to determine the exposure, when there are objects with different light levels and intensities. For example, if you are taking a picture of the blue sky with no clouds or sun in the frame, the image will be correctly exposed, because there is just one light level to deal with. The job gets a little harder if you add a few clouds into the image – the meter now needs to evaluate the brightness of the clouds versus the brightness of the sky and try to determine the optimal exposure. As a result, the camera meter might brighten up the sky a little bit in order to properly expose the white clouds – otherwise, the clouds would look too white or “overexposed”.

What would happen if you added a big mountain into the scene? Now the camera meter would see that there is a large object that is much darker (relative to the clouds and the sky), and it would try to come up with something in the middle, so that the mountain is properly exposed as well. By default, the camera meter looks at the light levels in the entire frame and tries to come up with an exposure that balances the bright and the dark areas of the image.

MATRIX METERING

Matrix Metering or Evaluative Metering mode is the default metering mode on most DSLRs. It works similarly to the above example by dividing the entire frame into multiple “zones”, which are then all analyzed on individual basis for light and dark tones. One of the key factors (in addition to color, distance, subjects, highlights, etc) that affects matrix metering, is where the camera focus point is set to. After reading information from all individual zones, the metering system looks at where you focused within the frame and marks it more important than all other zones. There are many other variables used in the equation, which differ from manufacturer to manufacturer. Nikon, for example, also compares image data to a database of thousands of pictures for exposure calculation.

You should use this mode for most of your photography, since it will generally do a pretty good job in determining the correct exposure. I leave my camera metering mode on matrix metering for most of my photography needs, including landscape and portrait photography.

CENTER WEIGHTED METERING

Using the whole frame for determining the correct exposure is not always desirable. What if you are trying to take a headshot of a person with the sun behind? This is where center-weighted metering comes in handy. Center-weighted Metering evaluates the light in the middle of the frame and its surroundings and ignores the corners. Compared to Matrix Metering, Center-weighted Metering does not look at the focus point you select and only evaluates the middle area of the image.

Use this mode when you want the camera to prioritize the middle of the frame, which works great for close-up portraits and relatively large subjects that are in the middle of the frame. For example, if you were taking a headshot of a person with the sun behind him/her, then this mode would expose the face of the person correctly, even though everything else would probably get heavily overexposed.

SPOT METERING

Spot Metering only evaluates the light around your focus point and ignores everything else. It evaluates a single zone/cell and calculates exposure based on that single area, nothing else. This is a good mode to use for  bird photography, because the birds mostly occupy a small area of the frame and I need to make sure that I expose them properly, whether the background is bright or dark. Because the light is evaluated where I place my focus point, I could get an accurate exposure on the bird even when the bird is in the corner of the frame. Also, if you were taking a picture of a person with the sun behind but they occupied a small part of the frame, it is best to use the spot metering mode instead. When your subjects do not take much of the space, using Matrix or Center-weighted metering modes would most likely result in a silhouette, if the subject was back-lit. Spot metering works great for back-lit subjects like that.

Another good example of using spot metering is when photographing the Moon. Because the moon would take up a small portion of the frame and the sky is completely dark around it, it is best to use Spot metering – that way, we are only looking at the light level coming from the moon and nothing else.

Some DSLRs like the Canon 1D/1Ds are capable of multi-spot metering, which basically allows choosing multiple spots to measure light and come up with an average value for a good exposure.

Filed Under: Photography

Working the Lines in Photography

October 10, 2010

Lines can be effective elements of composition, because they give structure to your photographs. Lines can unify composition by directing the viewer’s eyes and attention to the main point of the picture or lead the eyes from one part of the picture to another. They can lead the eyes to infinity, divide the picture, and create patterns. Through linear perspective, lines can lend a sense of depth to a photograph. (Linear perspective causes receding parallel lines to appear to converge in the picture. This allows you to create an illusion of depth in your pictures.)

The viewer’s eyes tend to follow lines into the picture (or out of the picture) regardless of whether they are simple linear elements such as fences, roads, and a row of phone poles, or more complex line elements, such as curves, shapes, tones, and colors. Lines that lead the eye or direct attention are referred to as leading lines. A good leading line is one that starts near the bottom corner of the scene and continues unbroken until it reaches the point of interest. It should end at this point; otherwise, attention is carried beyond the primary subject of the photograph. The apparent direction of lines can often be changed by simply changing viewpoint or camera angle.

Vertical, diagonal, horizontal, and curved lines create different moods. Vertical lines communicate a sense of strength, rigidity, power, and solidarity to the viewer. On the other hand, horizontal lines represent peace, tranquillity, and quietness. A generally accepted practice is to use a vertical format for pictures having predominantly vertical lines and horizontal format for pictures having predominantly horizontal lines. Again, this is a generally accepted practice, NOT a rule.

Filed Under: Photography

Emphasis: Focal Points in Design

October 9, 2010

Something that is singled out or made more prominent has emphasis. An element of a design that dominates or becomes the center of interest has emphasis. Within the visual components of a page design, emphasis is applied to individual parts such as a word or phrase by changing its appearance, making it stand out. Sometimes considered a principle of design on its own, emphasis can be created using all of the various elements and principles of design.

Emphasis and the Elements of Design
Create a focal point by making one element of the design more prominent or eye-catching than the others.

  • Line. In a design composed of horizontal lines, the vertical line becomes the focal point.
  • Shape. A square stands out from a group of circles or organic shapes.
  • Mass. The physically or visually heavier element or piece commands more attention.
  • Texture. Embossing adds tactile interest and emphasis.
  • Color. A splash of color or a strong change in value in an otherwise gray piece will draw the eye.

Emphasis and the Principles of Design
Use the arrangement of the page components to create a focal point or visual hierarchy of dominant and subordinant elements.

  • Balance. A perfectly symetrical piece may have no focal point because each element is equally emphasized. Radial balance generally draws the eye first to the central point in the design.
  • Proximity. A part of the design that is isolated from other parts can become a focal point.
  • Alignment. The eye is naturally drawn to a point in or near the center of a page, giving elements in that area perceived importance.
  • Repetition. Repeating an image or a word can establish its importance.
  • Contrast. Set words or phrases in a contrasting bold type or italics to give them emphasis.
  • White space. Use white space to isolate elements and give them emphasis.

Filed Under: Graphic Design

  • « Previous Page
  • 1
  • …
  • 63
  • 64
  • 65
  • 66
  • 67
  • …
  • 71
  • Next Page »

Most Recent

  • Marvel’s Doctor Strange kicks Off The Blockbuster Season With A Magical $185M Opening
  • Disney Marvel’s ‘Shang-Chi’ Shatters Labor Day Box Office Record
  • Marvel’s ‘Black Widow’ Debuts With $80 Million in Theaters, $60 Million on Disney Plus
  • Latest List Of Upcoming Marvel Movies
  • Walt Disney Studios Announces Updated Release Schedule

Archives

Delivering Customer Experience Excellence

Let's give em' something to talk about!

Contact Us

  • Facebook
  • LinkedIn
  • Twitter

Copyright © 2025 · Archimedia Studios · Privacy Policy